
║Ń£ž┐žųŲŲ„ŽĄĮyĖ┼╩÷
įō║Ń£ž┐žųŲŲ„ŽĄĮy░³║¼ęįŽ┬ÄūéĆ╣”─▄Ż║
- ┐╔░┤µIįOČ©£žČ╚
- ┐╔’@╩Š«öŪ░£žČ╚║═ė├æ¶įOČ©£žČ╚
- ėą╔²£žĪóĮĄ£ž─ŻēK
- ┐╔ūŅĮK▀_ĄĮ║Ń£ž
Ę┬šµ▄ø╝■
- Keil 5
- Proteus 8.6
ŽĄĮyįOėŗ
ļŖ┬ĘįOėŗ

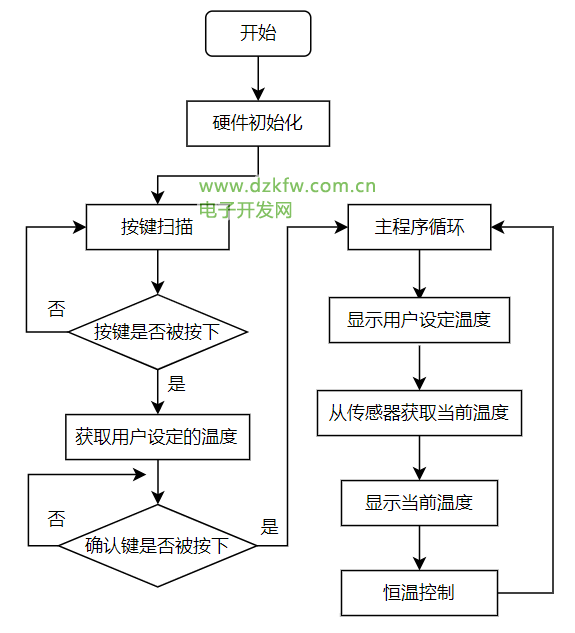
║Ń£ž┐žųŲŽĄĮyę╗╣▓ėą6éĆ─ŻēKŻ¼Ęųäe╩Ūų„┐žąŠŲ¼─ŻēKĪó░┤µI▌ö╚ļ─ŻēKĪóįOČ©£žČ╚’@╩Š─ŻēKĪó«öŪ░£žČ╚’@╩Š─ŻēKĪó£žČ╚▓╔╝»─ŻēK║═╔²£žĪóĮĄ£ž─ŻēKĪŻ
- ░┤µI▌ö╚ļ─ŻēKŻ║įō─ŻēKė╔4*3Ą─ŠžĻćµI▒P║═1éĆ┤_šJ░┤Ōośŗ│╔ĪŻŽĄĮyäéķ_╩╝åóäė║¾Ż¼ė├æ¶═©▀^ŠžĻćµI▒P▌ö╚ļŽļę¬įOČ©Ą─£žČ╚(0ĪŃ~99ĪŃ)Ż¼▌ö╚ļ═Ļ«ģ║¾░┤Ž┬┤_šJµIŻ¼╚╗║¾īóįō£žČ╚öĄō■é„╦═Įoų„┐žąŠŲ¼AT89C51Ż╗
- įOČ©£žČ╚’@╩Š─ŻēKŻ║įō─ŻēKė╔ę╗éĆ2╬╗8Č╬LEDöĄ┤a╣▄śŗ│╔Ż¼ų„┐žąŠŲ¼AT89C51╩╣ė├P3┐┌┐žųŲįōöĄ┤a╣▄Ą─Č╬▀xŻ¼╩╣ė├P2.4║═P2.5ā╔éĆČ╦┐┌üĒ┐žųŲįōöĄ┤a╣▄Ą─╬╗▀xĪŻų„┐žąŠŲ¼AT89C51īóÅ─ŠžĻćµI▒PĄ├ĄĮĄ─įOČ©£žČ╚ą┼ŽóŻ¼═©▀^2╬╗8Č╬LEDöĄ┤a╣▄’@╩Š│÷üĒŻ╗
- £žČ╚▓╔╝»─ŻēKŻ╗įō─ŻēKė╔ę╗éĆDS18B20£žČ╚é„ĖąŲ„śŗ│╔ĪŻ╩╣ė├DS18B20£žČ╚é„ĖąŲ„▓╔╝»«öŪ░Ą─£žČ╚Ż¼▓óīóįō£žČ╚ą┼Žóé„╦═Įoų„┐žąŠŲ¼AT89C51Ż╗
- «öŪ░£žČ╚’@╩Š─ŻēKŻ║įō─ŻēKė╔ā╔éĆ74HC573µi┤µŲ„║═ę╗éĆ4╬╗8Č╬LEDöĄ┤a╣▄śŗ│╔Ż¼ų„┐žąŠŲ¼AT89C51╩╣ė├P2.6║═P2.7┐žųŲā╔éĆ74HC573µi┤µŲ„Ą─Ų¼▀xŻ¼ā╔éƵi┤µŲ„Ą─▌ö╚ļ┐┌Š∙┼cų„┐žąŠŲ¼Ą─P0┐┌ŽÓ▀BŻ¼▓ó╩╣ė├ę╗éĆ100ÜWĄ─┼┼ūĶū„×ķP0┐┌Ą─╔Ž└ŁļŖūĶŻ¼ā╔éƵi┤µŲ„Ą─▌ö│÷┐┌Ęųäe┼c4╬╗8Č╬LEDöĄ┤a╣▄Ą─Č╬▀x┐┌┼c╬╗▀x┐┌ŽÓ▀BŻ╗
- ╔²£žĪóĮĄ£ž─ŻēKŻ║įō─ŻēKė╔ę╗éĆŠG╔½LED║═ę╗éĆ╝t╔½LEDśŗ│╔Ż¼ŠG╔½LEDžōž¤ĮĄ£žŻ¼├┐ķWĀqę╗┤╬£žČ╚Ž┬ĮĄ0.5ĪŃŻ¼╝t╔½LEDžōž¤╔²£žŻ¼├┐ķWĀqę╗┤╬£žČ╚╔Ž╔²0.5ĪŃĪŻų„┐žąŠŲ¼AT89C51Ė∙ō■«öŪ░£žČ╚║═ė├æ¶įOČ©£žČ╚ų«ķgĄ─▓ŅųĄŻ¼üĒ┐žųŲ╔²£ž▀Ć╩ŪĮĄ£žŻ¼ęį▀_ĄĮ║Ń£žĄ──┐Ą─ĪŻ
▄ø╝■┤·┤aŠÄīæ
│╠ą“Ą─Š▀¾w┴„│╠╚ńŽ┬Ż║
- ė▓╝■│§╩╝╗»Ż¼ĻPķ]╦∙ėąĄ─öĄ┤a╣▄Ż╗
- ▀Mąąā╔┤╬░┤µIÆ▀├Ķ裣hŻ¼Ęųäe½@╚Īė├æ¶įOČ©£žČ╚Ą─╩«╬╗║═éĆ╬╗Ż¼½@╚Ī═Ļ«ģ║¾Ż¼┼ąöÓ┤_šJµI╩Ūʱ▒╗░┤Ž┬Ż¼╚ń╣¹ė├æ¶░┤Ž┬┤_šJµIät▀M╚ļĄĮų„│╠ą“裣hųąŻ╗
while(ok) //ė├æ¶įOČ©£žČ╚
{
while(key1 == 15)
{
key1 = keyscan();
delay(50);
}
while(key2 == 15)
{
key2 = keyscan();
delay(50);
}
delay(100);//Ą╚┤²┤_šJµI
}
//µI▒PÆ▀├Ķ
uchar keyscan()
{
uchar temp,key;
key = 15; // ─¼šJųĄŻ¼╚ń╣¹ø]ėą░┤µI░┤Ž┬keyŠ═×ķįō─¼šJųĄ
P1 = 0xfe; //Æ▀├ĶĄ┌ę╗ąą
temp = P1;
temp = temp & 0xf0;
if(temp!=0xf0)
{
delay(10); // čėĢrŽ¹ČČ
temp = P1;
temp = temp & 0xf0;
if(temp!=0xf0)
{
temp = P1;
switch(temp) //Æ▀├Ķ┴ą
{
case 0xee:
key = 1;
break;
case 0xde:
key = 2;
break;
case 0xbe:
key = 3;
break;
}
while(temp!=0xf0) //Ą╚┤²░┤µIßīĘ┼
{
temp = P1;
temp = temp & 0xf0;
}
}
}
P1 = 0xfd; //Æ▀├ĶĄ┌Č■ąą
temp = P1;
temp = temp & 0xf0;
if(temp!=0xf0)
{
delay(10); // čėĢrŽ¹ČČ
temp = P1;
temp = temp & 0xf0;
if(temp!=0xf0)
{
temp = P1;
switch(temp) //Æ▀├Ķ┴ą
{
case 0xed:
key = 4;
break;
case 0xdd:
key = 5;
break;
case 0xbd:
key = 6;
break;
}
while(temp!=0xf0) //Ą╚┤²░┤µIßīĘ┼
{
temp = P1;
temp = temp & 0xf0;
}
}
}
P1 = 0xfb; //Æ▀├ĶĄ┌╚²ąą
temp = P1;
temp = temp & 0xf0;
if(temp!=0xf0)
{
delay(10); // čėĢrŽ¹ČČ
temp = P1;
temp = temp & 0xf0;
if(temp!=0xf0)
{
temp = P1;
switch(temp) //Æ▀├Ķ┴ą
{
case 0xeb:
key = 7;
break;
case 0xdb:
key = 8;
break;
case 0xbb:
key = 9;
break;
}
while(temp!=0xf0) //Ą╚┤²░┤µIßīĘ┼
{
temp = P1;
temp = temp & 0xf0;
}
}
}
P1 = 0xf7; //Æ▀├ĶĄ┌╦─ąą
temp = P1;
temp = temp & 0xf0;
if(temp!=0xf0)
{
delay(10); // čėĢrŽ¹ČČ
temp = P1;
temp = temp & 0xf0;
if(temp!=0xf0)
{
temp = P1;
switch(temp) //Æ▀├Ķ┴ą
{
case 0xe7:
key = 0;
break;
case 0xd7:
key = 0;
break;
case 0xb7:
key = 0;
break;
}
while(temp!=0xf0) //Ą╚┤²░┤µIßīĘ┼
{
temp = P1;
temp = temp & 0xf0;
}
}
}
return key;
}
- į┌ų„│╠ą“裣hųąŻ¼╩ūŽ╚š{ė├dis_set()║»öĄ’@╩Šė├æ¶įOČ©£žČ╚Ż╗
for(i=20;i>0;i--)
dis_set(key1, key2); //’@╩Šė├æ¶įOČ©Ą─£žČ╚
//’@╩ŠįOČ©£žČ╚║»öĄ
void dis_set(uchar k1, uchar k2)
{
display2(1, k1);
display2(2, k2);
display2(0, k1);
}
//įOČ©£žČ╚öĄō■’@╩Š║»öĄ
void display2(uchar num, uchar tem_data)
{
if(num==0)
{
S1 = 1;
S2 = 1;
delay(5);
}
if(num==1)
{
S1 = 0;
S2 = 1;
P3 = table[tem_data]; //table×ķ 0-9Ą─16▀MųŲŠÄ┤a▒Ē
delay(5);
}
else if(num==2)
{
S1 = 1;
S2 = 0;
P3 = table[tem_data];
delay(5);
}
}
╚╗║¾į┘Å─£žČ╚é„ĖąŲ„½@╚Ī«öŪ░£žČ╚Ż¼½@╚Ī«öŪ░£žČ╚Ą─┴„│╠╚ńŽ┬łD╦∙╩ŠŻ¼Ž╚š{ė├DSreset()║»öĄ▀Mąą£žČ╚é„ĖąŲ„Ą─│§╩╝╗»Ż¼į┘š{ė├temwrite()║»öĄŻ¼ī”é„ĖąŲ„īæ╚ļ£žČ╚▐DōQĄ─ųĖ┴ŅŻ¼▀Mąą£žČ╚½@╚Ī║═▐DōQŻ¼╚╗║¾š{ė├get_tem()║»öĄī”é„ĖąŲ„īæ╚ļūx╚Ī╝─┤µŲ„ųĖ┴ŅŻ¼Å─╝─┤µŲ„ųąūx╚Ī┤µā”Ą─£žČ╚öĄō■Ż¼▓óī”įōöĄō■▀MąąŠ½Č╚▐DōQ╠Ä└ĒŻ¼ūŅ║¾½@Ą├ę╗éĆ▒Ż┴¶┴╦1╬╗ąĪöĄĄ─«öŪ░£žČ╚öĄō■Ż╗

temchange(); //½@╚Ī«öŪ░£žČ╚
//£žČ╚½@╚Ī║═▐DōQ║»öĄ
void temchange(void)
{
DSreset();
delay(1);
temwrite(0xcc); //īæ╠°▀^ROMųĖ┴Ņ
temwrite(0x44); //ī棞Č╚▐DōQųĖ┴Ņ
}
//ūx╚Ī╝─┤µŲ„ųą┤µā”Ą─£žČ╚öĄō■
uint get_tem(void)
{
uchar l8,h8;
DSreset();
delay(1);
temwrite(0xcc); //īæ╠°▀^ROMųĖ┴Ņ
temwrite(0xbe); //īæūx╝─┤µŲ„ųĖ┴Ņ
l8 = temread(); //ūxĄ═8╬╗öĄō■
h8 = temread(); //ūxĖ▀8╬╗öĄō■
tem = h8;
tem = tem<<8;
tem = tem|l8; //║Ž│╔ę╗éĆ16╬╗öĄō■
f_tem = tem*0.0625;
tem = f_tem*10+0.5; //*10ė├ė┌▒Ż┴¶1╬╗ąĪöĄ³cŻ¼+0.5ė├ė┌╦─╔ß╬Õ╚ļ
return (tem);
}
DS18B20£žČ╚é„ĖąŲ„Ą─╗∙▒Š▓┘ū„┤·┤a╚ńŽ┬Ż¼Ė„ĒŚ▓┘ū„ę¬ć└Ė±ū±╩žDS18B20£žČ╚é„ĖąŲ„Ą─Ģrą“łDŻ¼čėĢrĢrķgę¬ūŃē“Ż¼┐╔ęįĖ∙ō■╩╣ė├Ą─ų„┐žąŠŲ¼▀m«öĄžą▐Ė─裣hĄ─┤╬öĄüĒš{š¹čėĢrĪŻ
│§╩╝╗»
//£žČ╚é„ĖąŲ„│§╩╝╗»
uint DSreset(void)
{
uint i;
DS = 0;
i = 73;
while(i>0)
i--;
DS = 1;
i = 0;
while(DS)
{//Ą╚┤²DS18B20└ŁĄ═┐éŠĆ
delay(1);
i++;
if(i>10)
{
return 0;//│§╩╝╗»╩¦öĪ
}
}
DS = 1;
return 1;//│§╩╝╗»│╔╣”
}
ūx1╬╗öĄō■
//ūx1╬╗öĄō■
bit temreadbit(void)
{
uint i;
bit tem_bitdata;
DS = 0;
i++; //čėĢr
DS = 1;
i++;
i++;
tem_bitdata = DS;
i = 10;
while(i>0)
i--;
return(tem_bitdata);
}
ūx1ūų╣ØöĄō■
//ūx1ūų╣ØöĄō■
uchar temread(void)
{
uint i;
uchar j,tem_data;
for(i=1;i<=8;i++)
{
j = temreadbit();
tem_data = (j<<7)|(tem_data>>1); //ęŲ╬╗Ż¼ūīūŅĄ═╬╗į┌ūŅ║¾├µ
}
return (tem_data);
}
īæ1ūų╣ØöĄō■
//īæ1ūų╣ØöĄō■
void temwrite(uchar tem_data)
{
uint i;
uchar j;
bit send_bitdata;
for(j=1;j<=8;j++)
{
send_bitdata = tem_data&0x01; //╚Īę¬░l╦═öĄō■Ą─ūŅĄ═╬╗
tem_data = tem_data>>1; //ėęęŲę╗╬╗
if(send_bitdata) //īæ1
{
DS = 0;
i++;
i++;
DS = 1;
i = 10;
while(i>0)
i--;
}
else //īæ0
{
DS = 0;
i = 10;
while(i>0)
i--;
DS = 1;
i++;
i++;
}
}
}
- ½@╚Ī═Ļ«öŪ░£žČ╚Ż¼š{ė├dis_tem()║»öĄ’@╩Š«öŪ░£žČ╚Ż╗
for(i=20;i>0;i--) //’@╩Š«öŪ░£žČ╚
dis_tem(get_tem());
//’@╩Š«öŪ░£žČ╚║»öĄ
void dis_tem(uint t)
{
uchar i;
i = t/100; //╚Ī£žČ╚Ą─╩«╬╗
display1(1,i);
i = t%100/10; //╚Ī£žČ╚Ą─éĆ╬╗
display1(2,i+10);
i = t%10; //╚Ī£žČ╚Ą─ąĪöĄ³c║¾ę╗╬╗
display1(3,i);
}
//«öŪ░£žČ╚öĄō■’@╩Š║»öĄ
void display1(uchar num, uchar tem_data)
{
WE = 1; //▀x╬╗,Ą═ļŖŲĮėąą¦
P0 = ~((0x01)<<(num));
WE = 0;
DU = 1; //▀xČ╬Ż¼Ė▀ļŖŲĮėąą¦
P0 = table[tem_data];
DU = 0;
delay(10);
}
- īó«öŪ░£žČ╚║═ė├æ¶įOČ©£žČ╚é„╚ļdeal()║»öĄŻ¼▀Mąą║Ń£ž┐žųŲŻ¼į┌║Ń£ž┐žųŲ║»öĄdeal()ųąŻ¼Ė∙ō■┼ąöÓ«öŪ░£žČ╚║═ė├æ¶įOČ©£žČ╚ų«ķgĄ─▓ŅųĄ▀Mąą▓╗═¼Ą─╠Ä└ĒŻ¼╚ń╣¹«öŪ░£žČ╚ąĪė┌ė├æ¶įOČ©£žČ╚Ż¼Š═▀Mąą╔²£ž╠Ä└ĒŻ¼╝┤╝t¤¶ķWĀqę╗┤╬Ż¼├┐ķWĀqę╗┤╬£žČ╚╔Ž╔²0.5ĪŃŻ¼╚ń╣¹«öŪ░£žČ╚┤¾ė┌ė├æ¶įOČ©£žČ╚Ż¼Š═▀MąąĮĄ£ž╠Ä└ĒŻ¼╝┤ŠG¤¶ķWĀqę╗┤╬Ż¼├┐ķWĀqę╗┤╬£žČ╚Ž┬ĮĄ0.5ĪŃŻ¼╚ń╣¹«öŪ░£žČ╚┼cė├æ¶įOČ©£žČ╚ŽļĄ╚Ż¼ät▓╗ū÷╠Ä└ĒŻ¼ų╗’@╩Š£žČ╚Ż╗
void deal(uint t, uint t_set)
{
uchar i;
if(tt_set)
{
work(15, 0x40); //ĮĄ£ž
}
else
{
i = 15;
while(i--)
{
dis_tem(tem_set);
dis_set(key1, key2);
}
}
}
//╔²£žĪóĮĄ£ž─ŻēK
void work(uint s, uchar led)
{
uchar i;
if(led==0x20)
{
i = s;
led0 = ~(led0); //¤¶┴┴
tem = tem+5;
while(i--)
{
dis_tem(tem);
dis_set(key1, key2);
}
led0 = ~(led0); //¤¶£ń
i = s;
while(i--)
{
dis_tem(tem);
dis_set(key1, key2);
}
}
else
{
i = s;
led1 = ~(led1); //¤¶┴┴
tem = tem-5;
while(i--)
{
dis_tem(tem);
dis_set(key1, key2);
}
led1 = ~(led1); //¤¶£ń
i = s;
while(i--)
{
dis_tem(tem);
dis_set(key1, key2);
}
}
}
- ▀Mąąę╗┤╬║Ń£ž┐žųŲ║¾Ż¼ŽĄĮyėų╗žĄĮų„│╠ą“裣hĄ─Ų╩╝³cŻ¼▓╗öÓųžÅ═╔Ž╩÷3-5▓Į¾EŻ¼╩╣£žČ╚▒Ż│ųį┌ė├æ¶įOČ©Ą─£žČ╚Ż¼▀_ĄĮ║Ń£žĄ─ą¦╣¹ĪŻ
 ĘĄ╗žĒö▓┐
 ╦óą┬Ēō├µ
 Ž┬ĄĮĒōĄū